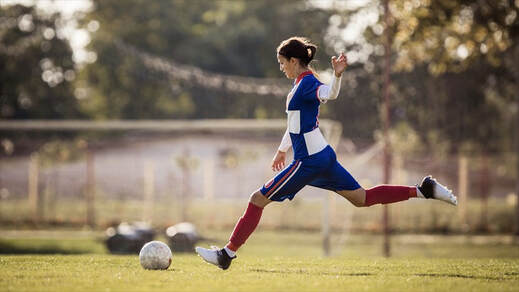
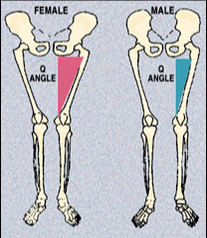
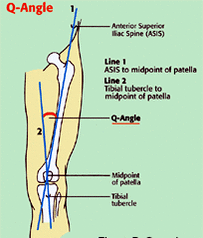
 Welcome back! Last week I introduced a new series on knee health which included 3 exercises to test your own confidence in your legs/knees during functional movement patterns. I encourage you to try those out - they are great bench-markers to whether you should be including specific exercises to help make them easier This week, we are looking at Women's Health, and I would like to discuss the prevalence of knee injuries (particularly ACL tears) among females. Keep in mind that this is not just for athletes! There are specific training methods and considerations that all females should be mindful of, and beginning at young age! Males alike should also be mindful of this injury mechanism, and how to prevent it. What is the ACL?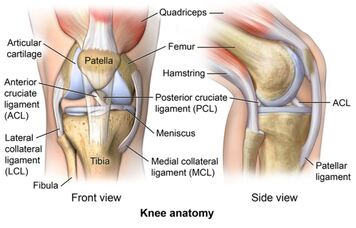 There are four main ligaments that stabilize the knee. The anterior cruciate ligament (ACL) is responsible for stabilizing rotational movements at the knee that occur during cutting and pivoting activities. The ACL is also a secondary restraint to knee hyperextension. The ACL stabilizes the knee joint in two ways. First, the ligament acts as a passive restraint to excessive movement through its connection to the tibia and femur. Second, the ACL has mechanically sensitive nerve receptors, called proprioceptors, which sense the position of a joint. When a joint starts to exceed its normal range or speed of movement these proprioceptors will send a signal to the brain and spinal cord, which in turn stimulates the appropriate musculature to stabilize the joint. Mechanism of injuryThe incidence of female ACL tears to male is 3.5 times greater in basketball and 2.8 times greater in soccer (sourced here). An ACL injury usually occurs without contact from another player or object. The most common form of non-contact injury is a deceleration injury, like when slowing down from a fast run, or landing from a jump or a big step. Often it is a combination of forces when planting to cut or change directions, and the ACL cannot withstand the force placed on it, so it tears. This causes the knee to buckle or give out. The ACL also can be torn if the knee is forcefully hyperextended This is why EVERYONE should be aware of this, not just athletes - it could be during spontaneous play with the kids, yard work, an awkward step while hiking, or descending stairs. Anatomical and movement landmarks that may increase your risk of ACL injuryBefore going into the following list of risks, I just want to state the obvious, and make clear that these risks are not unique to females! Rather, a combination of these factors as part of the injury mechanism are what is seen most commonly when it comes to ACL tears.
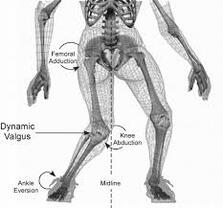
 Altered Neuromuscular activation. Gender differences in neuromuscular activation patterns have been reported to contribute, to ACL injury. Compared to males, females have been found to be less effective in stiffening their knee (sourced here). As these studies indicate, this is largely due to less overall muscle strength and endurance, and altered muscle recruitment order, when compared to male counterparts. 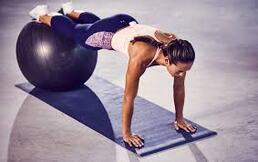 Core Stability: An efficient “core” provides for a stable base so the lower extremity can function with an optimal kinetic chain to reduce forces and dynamically stabilize against abnormal forces. If the extremity muscles are strong and the core is weak, not enough force will be created to produce efficient movements. It is these inefficient movements and abnormal agonist/antagonist relationship from an unstable “core” that set the stage for injury (sourced here) . Proven training method in preventing ACL injuryPrevention programs have now been implemented due to a better understanding of females’ increased risk of ACL injury. Neuromuscular and proprioceptive training have focused on improving landing technique to prevent injury, including but not limited to, minimizing knee valgus, improving balance, agility and core strengthening and more hip and knee flexion. Mandelbaum et al. have advocated a “Prevent Injury and Enhance Performance” (PEP) Program that includes three warm-up activities, five trunk and lower extremity stretches, three strengthening exercises, five plyometric activities and three soccer-specific agility drills. Click Here for a video highlighting these specific exercises Multiplanar warmup. Stay low as you perform each exercise. Emphasize loading the hips, knees, and ankles equally.
Activation exercises
Conditioning exercises
More knowledge and weapons for your arsenal as you stay fit, remain functional, and prevent injuries! Take this to the gym (or yard, or driveway, wherever you're training these days!)
Until next time!
0 Comments
Healthy Knees: Intro to a new blog series. 3 exercises you need to do pain free with aging!9/25/2020 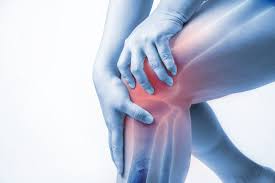 One of the most common issues I (and most trainers and therapists) hear during an initial consult include the phrase "bad knees", or "knee pain," followed by a long littany of things this pain prevents them from being able to do! It doesn't have to be this way! Yes, with aging, knees and other joints do tend to lose some strength and integrity. But even with a history of acute injury, knee pain is preventable and reversible by our day-to-day habits. This new blog series is dedicated to that effort, so be sure to check back for future posts as we explore knee health! DID YOU KNOW?? The source of chronic knee pain is very rarely from in or around the knee itself!! Most knee pain originates with dysfunction downstream (foot and ankle) or upstream (hip and lower back)! To kick off the series, I would like to highlight the top three exercises you should be able to perform WITHOUT pain. Test #1. Get off of the floor without using your handsI often use this exercise with my clients as part of basic movement screening, so it tests more than just the knees. It is a powerful indicator of overall functional strength and basic mobility. Begin by laying on the floor, flat on your back. Now, while keeping your hands completely free and up in the air, see if you can get off of the floor without touching anything! NOTE: there is more than one way of doing this successfully! If you did it once, great! See if you can do it my mirroring which side or leg you counted on during the first test - can you do it just as easily both ways, and without pain or discomfort? Are you able to stand up onto both feet at once?? (this is very difficult for most adults to do without hands) If you had to put your hands down for leverage during the stance portion of the test, chances are you have lost the confidence in your legs to get you up. Test #2. The Surrender LungeThe surrender lunge is another excellent indicator of functional mobility, motor control, and strength (see video of me doing a surrender lunge, from my recent post on cinder block exercises ). With the controlled deceleration down, and tension required to transfer legs, it translates into how you would perform stairs, and other critical single leg movements required during day-to-day life. Stand with at least 5 feet of space behind you (overhead weight is optional). Step back into a reverse lunge, lowering down to both knees (the surrender position), and then reposition your stepping leg forward to lunge back up to starting position. It might take a few tries, but see if you can get into a rhythm until you can perform it successfully. Retest, leading with the other leg. If you are able to keep an upright posture throughout the whole sequence without knee pain on either side, you passed! Didn't pass? That's ok! Try performing reverse lunges or walking lunges. If you need your hands to push on your legs during the stance portion, or if there is knee pain associated with lowering or standing, it is an indication you lack proper strength and mobility for optimal knee health. Overhead squat with parallel feetThe third functional test is the overhead squat with parallel feet. You might recognize this from another one of my recent posts on using the overhead squat self-test, but this is simply a great indicator of knee health. If there is pain or buckling in the knee, there are upstream and downstream issues that are preventing proper tracking of the knee. By placing hands overhead, it puts strategic tension through the whole body, but will illuminate tracking issues related to the knee. 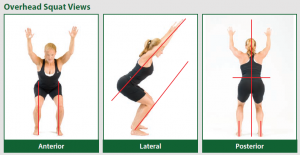 How to perform an Overhead Squat Assessment You must have a mirror for this self assessment at the very least, but it's the best if you have a superfriend, loved one, or anyone else around with a camera to take pictures from the front, side, and posterior and then compare them to the pictures below. Or, simply use voice commands on your phone to take a picture.
You PASS if you can squat to 90 degrees, keeping your feet straight, and without buckling or pain in the knees! NOTE: there may be other impairments with the squat, as detailed in my previous post, but in terms of knee pain, it's a great sign if you can do this pain free! Didn't Pass?? If you experienced pain, try the same test with a wider stance, and feet flared out into a V shape. If that is easier and doable without pain, it points to hip mobility as the culprit! If pain persists, it may be lack of glute activation or strength and/or ankle mobility. Try these exercises for yourself, and see if you can train up to doing them properly. Performing these is the first step to knowing whether you have issues that need to be addressed. If there is persistent pain, dysfunction, and discomfort in those simple movement patterns, it is a good indicator that you are a good candidate for chronic knee pain! Be sure to follow along to the rest of this series as we explore solutions.
Until next time! "I sit all day at my desk while working"
"Wow, OK, so I should find a way to stand all day"
"So, have a workspace that easily allows me to switch off and on between sitting and standing throughout the day?"
If spending a lot of money on a standup desk isn't in the cards, here are 5 great options to set up your workspace to allow sitting, standing, AND walking as you work
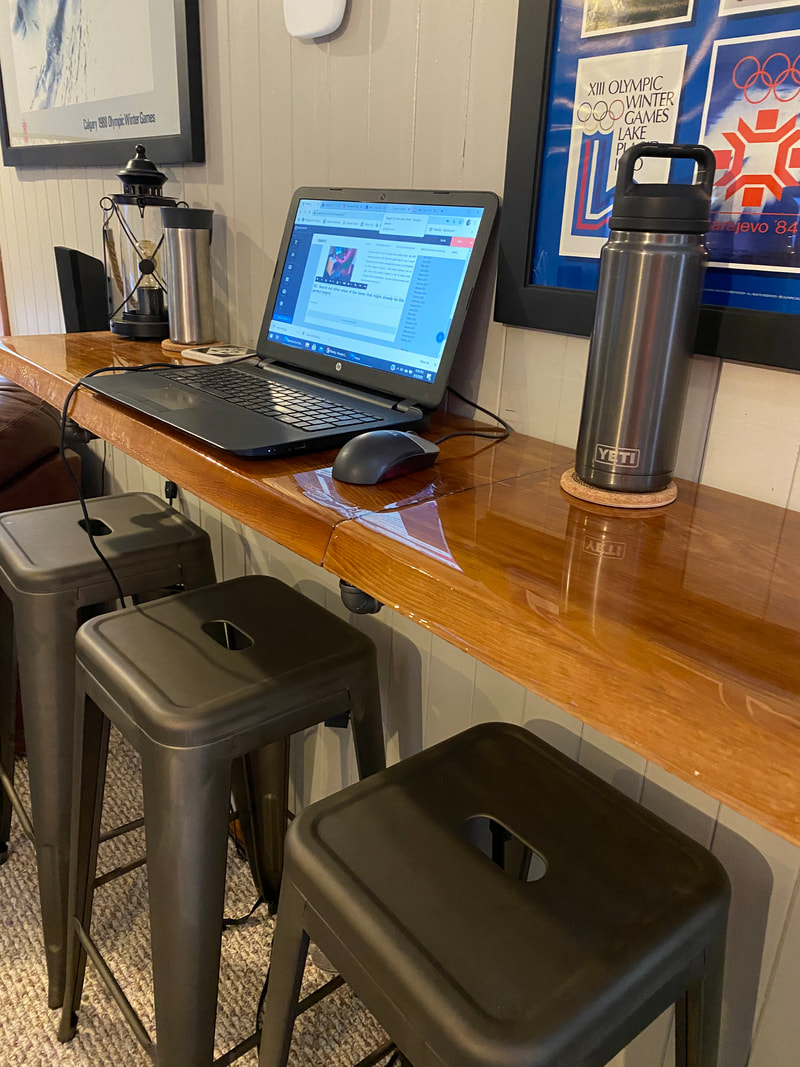
#1. Retrofit! Search around the house to find suitable modification opportunities for your current desk.
#2. Search out other areas of the home that might already be the perfect height
#3. Build your own adjustable desk for under $50!
I searched around for a great way to build an adjustable height desk. Here is a video example of how to build one for under $50.
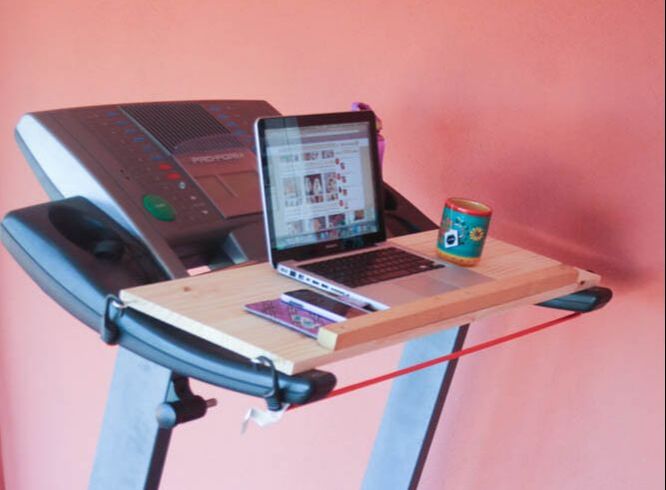
#4. Retrofit your treadmill to a WALKING workstation
#5. Walk and talk
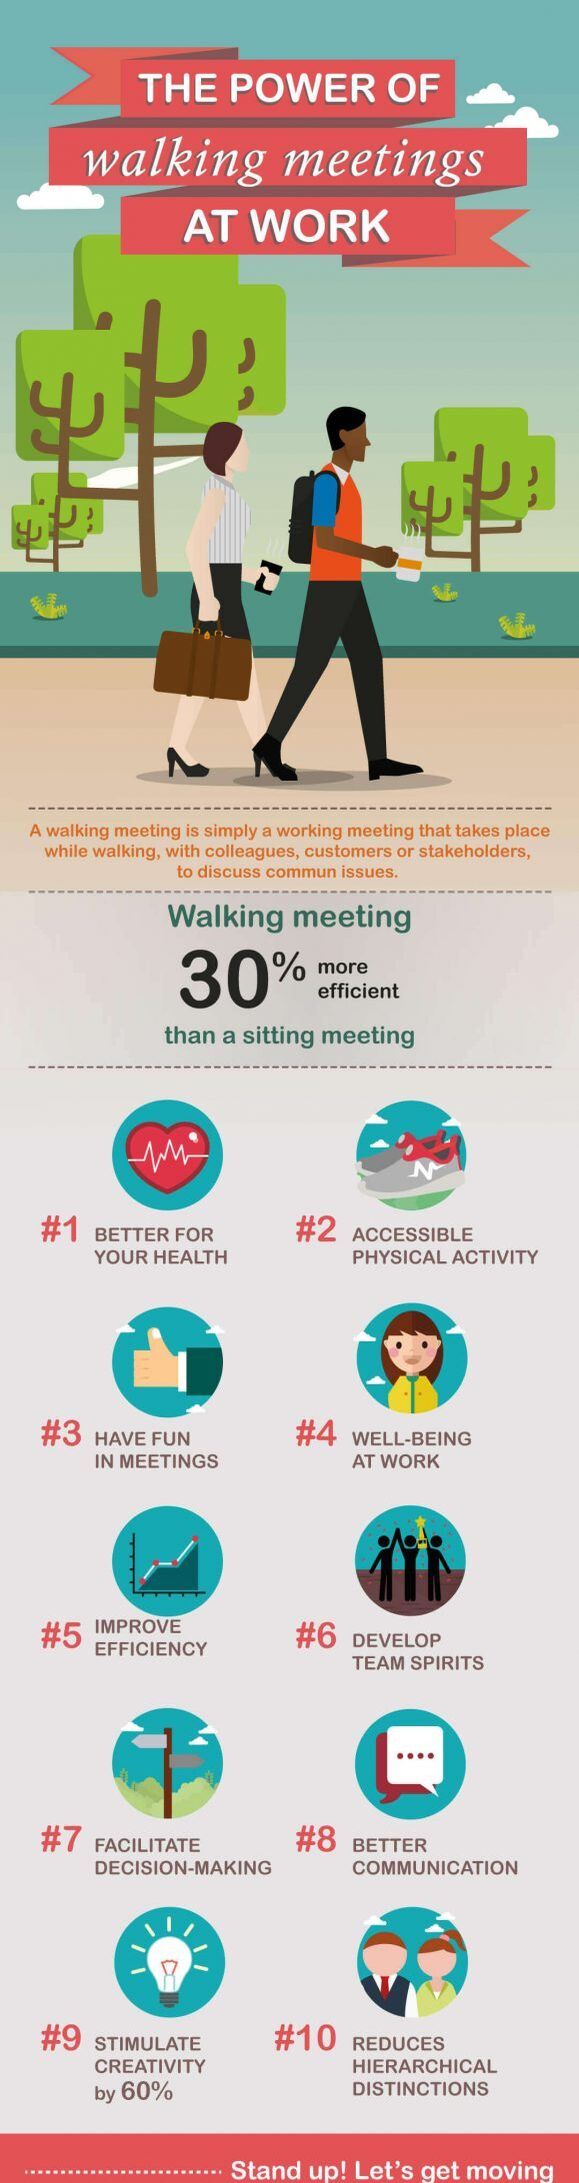
We all know it, but our phones, Bluetooth, and wireless technology remove all excuses, and allow for a lot of business to be conducted while walking away from your desk! Your standing and/or walking workspace could be your hallways, staircases, deck, driveway, sidewalk, and yard. Your muscles and joints can't tell if you have a $1000 adjustable desk, or a $3000 treadmill desk! As long as you are up and walking, gravity acts the same. Adopt this healthy habit wherever you can fit it during the day! Look for opportunities, and they will show themselves, whether at home or at work! I'll leave you with the infographic below with benefits of walking meetings. Until next time!
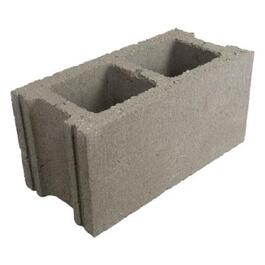
Hi Everyone! Welcome back for another edition of improvised home equipment! For previous editions, check out my other posts in this series, including my homemade ruck plate and my homemade weighted sled So, there is a shortage of barbells and dumbells right now. Even if they were available, you would be paying $2-3 PER POUND! If you are looking for an extremely versatile and worthy substitution, you may not need to look further than your shed, or the masonry aisle at your nearest big box store. Cinder blocks offer so much versatility (plus useful around the house and yard in many other ways) Your muscles will not know the difference between a $60 dumbell, or a $2 block of the same weight! FACT: Most people can use 20lb and/or 30lb weights as part of their workout. Even if you cannot do all of the exercises in the video, there are some that will be suitable for increasing your strength, no matter who you are! Future posts will include workouts using some exercises from the video I bought 4 full blocks weighing 30 lbs each, for $1.10 apiece. And, two half blocks weighing 20 lbs each, @ $1.29 apiece at Home Depot. All of these for under $7! Watch my video below with over 50 exercises, and a brief instructional on how to convert them to dumbells! (super fast and easy!) Later in the video, I show how you can use spare steel pipe as a stand-in for a barbell! All exercises are listed in order, with time reference in the video. Future posts will include full workouts using these exercises. Materials needed: 1x1 board (45" total) Galvanized steel pipe (6-8 feet). Click here for link, if you don't have one laying around somewhere Ratchet straps Playlist0:00: Overhead single are press 00:5: Single arm squat with overhead press (thruster) 0:11: Goblet squat 0:14: Squat with press-outs 0:17: Seated russian twist 0:19: Ground to overhead 0:20: Decline pushup 0:24: Decline single leg pushup 0:25: Narrow pushup 0:27: Side-to-side plyo pushup 0:33: Lateral crawl with block drag 0:44: Backwards crawl with block drag 0:54: Quick step 0:58: Depth reverse lunge 1:05: Depth pushup 1:10: Turkish getup 1:22: Overhead walking lunge 1:26: Lunge with front hold 1:29: Overhead surrender lunge 1:40: Weighted situp 1:45: Hammer curls 1:46: Calf raises 1:50: Swings 1:56: Pec flies 2:01: Single leg hip extension 2:09: TRANSFORMATION INTO DUMBELLS INSTRUCTIONAL DUMBELL EXERCISES: 3:02: Plank row 3:07: Pushup plank row 3:16: Bottom-up thruster 3:20: Lunge alphabet ("write" alphabet with the block, straight arms) 3:31: Windmills 3:40: Upright rows 3:43: Single arm snatch 3:48: Cleans 3:51: Snatch to windmill combo 3:56: Bottom-up surrender lunges 4:01: Side plank pull, flip, press 4:08: Weighted hip hinge 4:15: Squeeze chest press 4:19: Chest press (while planking across two blocks) 4:27: Full block upright rows 4:31: Pullover-to-chest press combo 4:42: Balanced single arm rows 4:48: Bent over rows 4:53: Dumbell burpees to full thruster combo 4:58: Rear foot elevated lunge-to-hinge combo (big block) 5:05: TRANSFORMING TO BARBELLS! 5:08 Barbell deadlifts 5:15: Split lunge 5:23: Overhead push press 5:30: Front squat 5:36: Reverse lunge 5:42: Single leg deadlifts
|
Broad Scope Narrow Focus BlogWelcome to the Broad Scope Narrow Focus Blog! I hope you find a lot of useful and applicable information as we explore the broad world of Wellness together. Check in often, as there will be new posts weekly! Enjoy Archives
September 2021
Categories |


 RSS Feed
Services |
Hours & Contact InformationHours of Operation: The Facility is staffed Tuesday - Thursday 7a-5p
*Facility is accessible 24 hrs / 7 days a week e . [email protected] p . (616) 787 - 7710 |