• Home
    • Meet the Staff
    • Membership
    • Valued Resources
  • Wellbeing That Works
  • Fitness Programs
    • Summer Celebration
    • Spotlight Members
    • Personal Training
  • Group Fitness
    • Class Sign-Up
  • League Play
    • Cornhole League >
      • Cornhole League Score Reporting
  • Pickle Plex
  • Nutrition
    • Healthy Cooking
    • Newsletters
  • Better, Healthier You Services
    • On Campus Bikes
Better, Healthier You Fitness Facility
  • Home
    • Meet the Staff
    • Membership
    • Valued Resources
  • Wellbeing That Works
  • Fitness Programs
    • Summer Celebration
    • Spotlight Members
    • Personal Training
  • Group Fitness
    • Class Sign-Up
  • League Play
    • Cornhole League >
      • Cornhole League Score Reporting
  • Pickle Plex
  • Nutrition
    • Healthy Cooking
    • Newsletters
  • Better, Healthier You Services
    • On Campus Bikes

Tim's Guide to the Trails part 3: Mountain biking

6/23/2020

0 Comments

 
Welcome  back!

This week I conclude my 3-part series on mastering the trails with mountain biking basics. 

For many, the idea of mountain biking can seem intimidating.  This post is geared towards educating those newer to riding with a basic rundown of equipment and skills.  However, sometimes the basics serve as good reminders for experienced riders as well.  Please comment if you have any other tips and tricks that work for you!

Bikes

Picture
29 inch wheels - "29er"
29er (means wheels are 29 inches in diameter).  These bigger wheels will have better momentum once rolling, meaning more progress for less effort and faster rolling over open terrain. A larger tire contact area on the trail, giving better traction and control when climbing or cornering.
Picture
27.5 inch wheels
Because of the smaller diameter, 27.5-inch wheels are easier to navigate through tight and tricky trails and respond to rider input more readily, which is especially true for smaller riders who might otherwise struggle to control larger (and generally heavier) 29ers
Picture
Fat Tire bikes
​Fat tire bikes have (obviously) the widest tires on the market. Their frames are also wide and heavy. They work the best in soft terrains like snow and sand, but they can handle any surface well. Their low tire pressure makes the tires much softer, folding over bumps instead of rolling over them
Picture
​26 inch wheels 
Being smaller, lighter and more agile, bikes with 26” wheels offer much better acceleration than their larger counterparts, making it great for short, steep climbs and fast-flowing, quick-turning trails
Picture
Front Suspension (AKA, hardtail)
Most riders have a front suspension.  It is right for you if you're on a budget, you mostly ride smoother terrain (like that in Michigan!) , you value low maintenance and a lighter a bike
Picture
Full Suspension
Best if you are riding over rocky terrain, or love downhilling. Full suspension will soak up most of the jarring bumps that would otherwise be sent to your body (and in some cases, buck you off your bike). This can help reduce fatigue, which in turn can allow you to ride faster, for longer, with greater comfort

Gears

Picture
Gearing
​
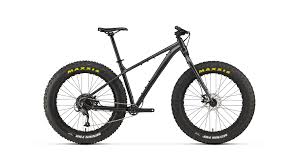
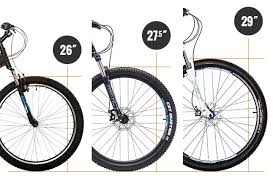
Gears are referred to in terms of number of chain rings, and number of teeth (or size) of chain ring.  Both of these can vary to fit the rider.  See to the left for a basic comparison.  Notice the top two include 2 rings of different size setups (numbers you see refer to teeth count).  Standard issue for a common 21 speed bike is 3  X  7 (3 rings on the front, and 7 rings on the back - bottom set in the picture).  This means 21 different gear ratios.  However, several of those gears are wasted, since you do not want to cross the chain (see image on the far left).  This puts stress on the chain - causes stretch and even breakage.

Gaining in popularity are 1X (pronounced One By) setups, which are perfect for riders who do not need to access the  "easiest" and "hardest" gear ratios.  1x9, 1x10, and 1x12 are all popular setups.  In Michigan,  most trails do not demand the extreme gears.  The more elevation demands, the more you want to retain the "granny gear"  - IE, if you're riding out west where there is a lot of climbing and more obstacles,  you need to be able to spin those easy gears fast for best handling.  
​


Bike recommendations based on terrain

Picture

Dirt/Flow/Gravel

Terrain: primarily dirt and hard packed
Shocks/suspension:  none or front
Gearing depends on elevation.  1X setup is perfect
Tires:  ​light - medium tread
Picture

Rocky/Rooty

Terrain:   Demands roll-over of rocks and roots almost constantly
Shocks/Suspension:  Full suspension recommended
​Gearing:  2X or 3X recommended
Tires: thick tread
Picture

Mixed

Terrain: Most trails have a mix, but are PRIMARILY one or the other.   Decide what type you will be on the most
Shocks/Suspension:  Front
Gearing:  1X or 2X 
Tires:  an "all-mountain" tread, or thicker tread to be safe

Skills of the trade

  • Vision (picking a line) - train your vision to look AWAY from obstacles.  Your wheels will go where your eyes go.  Scan ahead for hazards by looking about 15 – 20 ft. down the trail. Then, move your eyes back toward your tire. Doing this up-and-back action allows your eyes to take in lots of information. Knowing hazards ahead of time can help you adjust your balance and pick a line around them.
  • Positions: 
    • ​Climbing:  position seat so that you can get 80-90% knee extension (IE, seat slightly higher).  Knee should be slightly bent at 6 o'clock pedal position.  This allows more transfer of power
    • Descending:  Seat should be positioned lower, by about 2-3 inches than when climbing.  This lowers your center of gravity, and allows more control.  Pedaling power takes a back seat to control
    • Rolling hills:   If there is a mix of hills, it is best to keep your seat low to maintain control.  If the knees or hips don't respond well over time, adjust accordingly to comfort.
    • For more information on climbing and descending skills, click here
  • Cadence-  typically,  you will want to maintain a cadence of 90-120 RPM.  There will be times when you have to slow down when going over obstacles.  You must shift properly, and with anticipation of hills and obstacles, to maintain optimal cadence.  Hills demand higher cadence - if you're stuck grinding up a hill, you're in the wrong gear!  Click Here for 
  • Braking: Use of both front and rear brakes is important.  As a general rule, you want to favor the rear brake slightly, and feather the front brake (left hand).  Putting too much pressure on your front brake is dangerous, and can flip you over your handlebars if your center of gravity is forward of the middle of the bike.  Shift your bodyweight backwards, to put more weight over the rear wheel, before applying front brake
  • Shifting - The key to shifting is ANTICIPATION.  If you can see a steep hill coming, you want to enter the hill in the correct gear.  Avoid shifting while going over obstacles or up hills.  This can lead to rough shifting and wear and tear on the gears and chain
  • Climbing - best to error on the side of easier gear!  Your feet should move at a cadence at or greater than for flat ground.  Faster cadence gets you up the hill more efficiently, and if there are obstacles, will give you better handling and grip.  Grinding up a hill with a slow cadence can lead to spin-outs and inefficient pedaling.
  • Descending - best to stand on the pedals in a low crouch, with bodyweight back behind rear wheel.  This is the best ready position for braking, shock absorption, and cornering.  Avoid standing tall, make sure to maintain a low crouch, with butt almost completely behind the seat on a steep downhill
  • Cornering -  Going around turns efficiently and while carrying speed starts with good vision.  Every turn has an ENTRY point, and and EXIT point.  The entry depends on how tight the turn is, and whether it is banked.  Essentially,  your entry point of the turn should reflect the widest and safest path through the turn.  The EXIT is the point the bike goes straight again.  It is essential to look through the turn before entering it, so you can see as much of it as possible
  • Bunnyhopping - eventually,  hopping over obstacles will be preferable to rolling over them.  It involves crouching down, and jumping both wheels off of the ground (front, and then rear), and is considered an optional, but very useful skill when mountain biking.  Click Here for a great tutorial 
  • Track stands - balancing on your bike without needing to put your feet down is a great skill to have on the trail.  It allows you to "freeze" on the trail before the next obstacle,  but also keep you in position to get through it.  Track standing  is also easier than it sounds!  Click Here for a great tutorial

What's in the bag?  Essentials for your bike pack

Picture
  1.  Pack-  keep your pack small to midsize.  It should include a hydration feature, and still have space for some other essentials
  2. Extra tube
  3. Neosporin and bandage for cuts/scrapes
  4. Gauze
  5. Sometimes you might want to add or take air out of the tires during your ride, depending on terrain.  Obviously, air is required for tire/tube repair.  Carry a pump like this, or a CO2 cartridge
  6. Extra chain link - broken chains happen on the trail.  An extra link can be the difference between walking your bike back, or continuing your ride.  You will also need a:
  7. Chain link removal tool - this pushes the pin out of the link so it can be removed and replaced
  8. Disregard this item (see #12)
  9. Some like to carry a small wrench in case of a loose spoke, or need to tighten any loose nuts.  I wouldn't worry about this.  Most multitools (#12) will have an option for this
  10. Tire levers - used in removing and replacing tires to on the rim
  11. Patch kit - most flats can be repaired with patch for a tube.  Click Here for video on how to patch an inner tube
  12. Multitool - has specific tools for bikes.  This can replace most if not all other tools needed out on the trail.  Click Here for a great option
  13. Energy bar
  14. Gels - these are great for quick and easy nutrition
  15. Zip ties and extra wire -  can probably skip this one too, but may be useful in case of issues with the brake or gear cables.  These are advanced fixes, and most don't bother carrying these

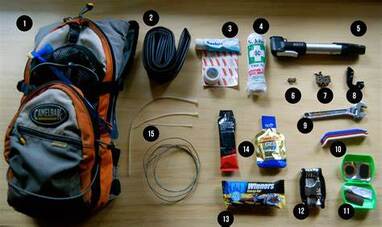
 Always recommended to make sure your bike is tuned up and ready before hitting the trails.  Take it to your nearest shop - a basic tune-up can last a whole riding season, and is inexpensive.  

Happy trails!
0 Comments


Leave a Reply.

    Broad Scope Narrow Focus Blog

    Welcome to the Broad Scope Narrow Focus Blog!   I hope you find a lot of useful and applicable information as we explore the broad world of Wellness together.  Check in often, as there will be new posts weekly!  Enjoy

    Archives

    September 2021
    July 2021
    June 2021
    May 2021
    April 2021
    March 2021
    February 2021
    January 2021
    November 2020
    October 2020
    September 2020
    August 2020
    July 2020
    June 2020
    May 2020
    April 2020
    March 2020

    Categories

    All
    Health From Home

    RSS Feed

Services

Fitness Facility
Group Fitness
Nutrition
League Play

Hours & Contact Information

Hours of Operation: The Facility is staffed Tuesday - Thursday 7a-5p 
*Facility is accessible 24 hrs / 7 days a week 
e . [email protected]       p . (616) 787 - 7710
  • Home
    • Meet the Staff
    • Membership
    • Valued Resources
  • Wellbeing That Works
  • Fitness Programs
    • Summer Celebration
    • Spotlight Members
    • Personal Training
  • Group Fitness
    • Class Sign-Up
  • League Play
    • Cornhole League >
      • Cornhole League Score Reporting
  • Pickle Plex
  • Nutrition
    • Healthy Cooking
    • Newsletters
  • Better, Healthier You Services
    • On Campus Bikes